Table of Contents
Inkscape for Laser Cutter
The purpose of this tutorial page is to give you tips/tricks on proper configuration and basic how-to's for using Inkscape with regards to our laser cutters at Chattlab. The screen grabs and descriptions at the time of this writing are based on Windows version 1.0. Your version may vary, especially if you are on Linux or MacOS.
About
Inkscape is a Free and open source vector graphics editor for GNU/Linux, Windows and MacOS X. It offers a rich set of features and is widely used for both artistic and technical illustrations such as cartoons, clip art, logos, typography, diagramming and flowcharting. It uses vector graphics to allow for sharp printouts and renderings at unlimited resolution and is not bound to a fixed number of pixels like raster graphics. Inkscape uses the standardized SVG file format as its main format, which is supported by many other applications including web browsers.
For more detailed information, see the Inkscape website.
Download
If you don't already have Inkscape installed, go here for the latest version of Inkscape. It supports Linux, Windows and MacOS.
Recommended Configuration Settings
Enable Auto-save
Infrequently, Inkscape can crash, or in some cases your computer may crash. There's nothing worse than working for an hour on your design and you lose it all. If it's a crash that Inkscape catches, it will create an emergency recovery file. HOWEVER, sometimes it's OS related, failing when sending to a printer/laser or perhaps just a general computer failure. Turning auto-save allows you to hopefully recover at least part of it, if not all.
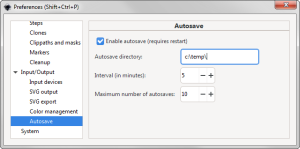
By going to Edit→Preferences, Input/Output, Autosave you can see your options. Go to this dialog and configure it the way you like. You may want to change the default autosave to a directory you have easy access to. Also set the autosave time. It's 10 minutes by default.

Set Geometric Bounding Box
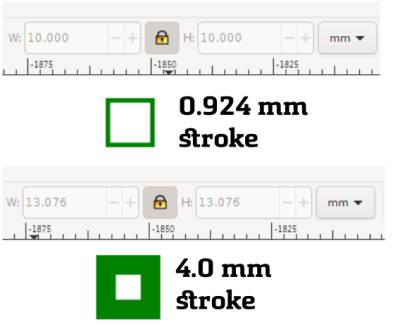
This setting is pretty critical. You will find that you want to change the height and width of your shapes with the inputs in the top bar. However, this size will include the thickness of the line. In the above example, changing the stroke size changes the size! This is not what you want when you are working with exacting standards for laser cutting. In the example below, note the W/H values. From 10mm to 13.076. This is NOT what you want. Note, that the physical coordinates won't change, but if you are looking at those sizes to figure out how much to add, or use as a guide, your calculations can be off. But there is a fix.
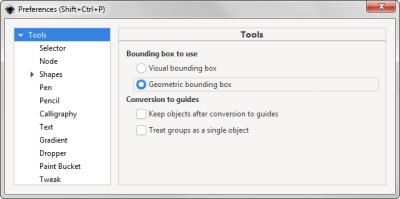
The simplest solution to this is to go to Edit>Preferences>Tools and set your bounding box to “Geometric bounding box”. This will let you change your stroke without seeing any changes in your sizes.

Quicker view changes shortcut (optional)
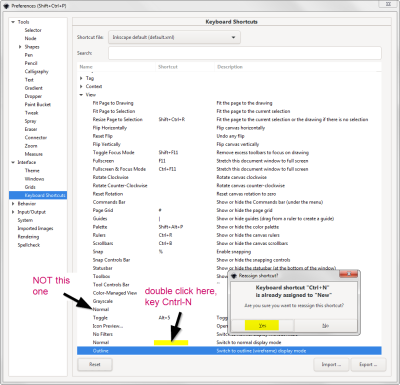
Jumping between “Normal” (pixels) and “Outline” (vector) can be painful when going through the menu, especially since you will find that when building SVG's for laser (or vinyl cutter and CNC) that you bounce between these two views quite frequently.  . Alternatively, you can use Control-5 to cycle through the 3 options of Normal, Outline, and Hairline. If you do this shortcut as prescribed, you will lose the shortcut for “New” file, or “Open” a file, options which are fairly infrequent.
Recommended Extensions.
Extensions are user created contributions that give additional functionalities to Inkscape. Here are the list that are highly recommended:
- Tabbed Box Maker - To create laser cut box designs including dividers.
- Living Hinge - This allows you to make a rectangle with slits to allow it to bend.
- Elliptical Box Maker - An extension that helps you create beautiful elliptical boxes.
Extension Installation
You can google the source files for these extensions and download them manually, or you can do the following to install all recommended extensions:
- Download the Chattlab extension pack HERE. Note, these extensions are for Inkscape version 1.0.
- Locate your extension folder by going to Edit>Preferences – System and find the User Extensions location. You can see an example of this dialog HERE.
- Unzip the downloaded file, and put the files in the extensions folder. Note, we have included a bat script in the zip file that should do this for you. It's called ExtensionInstall.bat.
- Restart inkscape.

